In the world of medical diagnostics, accuracy starts long before the sample reaches the analyzer. As a Biomedical Engineer working in this field since 2017, I have often seen high-end machines give “error” flags or “out-of-range” results, only to discover the problem was the collection tube itself.
Understanding the chemistry inside these tubes is essential for any engineer, lab technician, or medical student. Each colored cap represents a specific additive designed to preserve the blood’s integrity for a particular type of test. In this guide, I will break down every major collection tube, their additives, and why the “Order of Draw” is the most important rule in the lab.
1. Why Do Tubes Have Different Colors?
Blood is a living tissue. As soon as it leaves the human body, it begins to change. It clots, cells begin to die, and chemical concentrations shift. To prevent this, manufacturers add specific chemicals (anticoagulants or clot activators) to the tubes. The international standard color-coding system ensures that healthcare workers globally use the right tube for the right test.
2. The Comprehensive Tube Breakdown
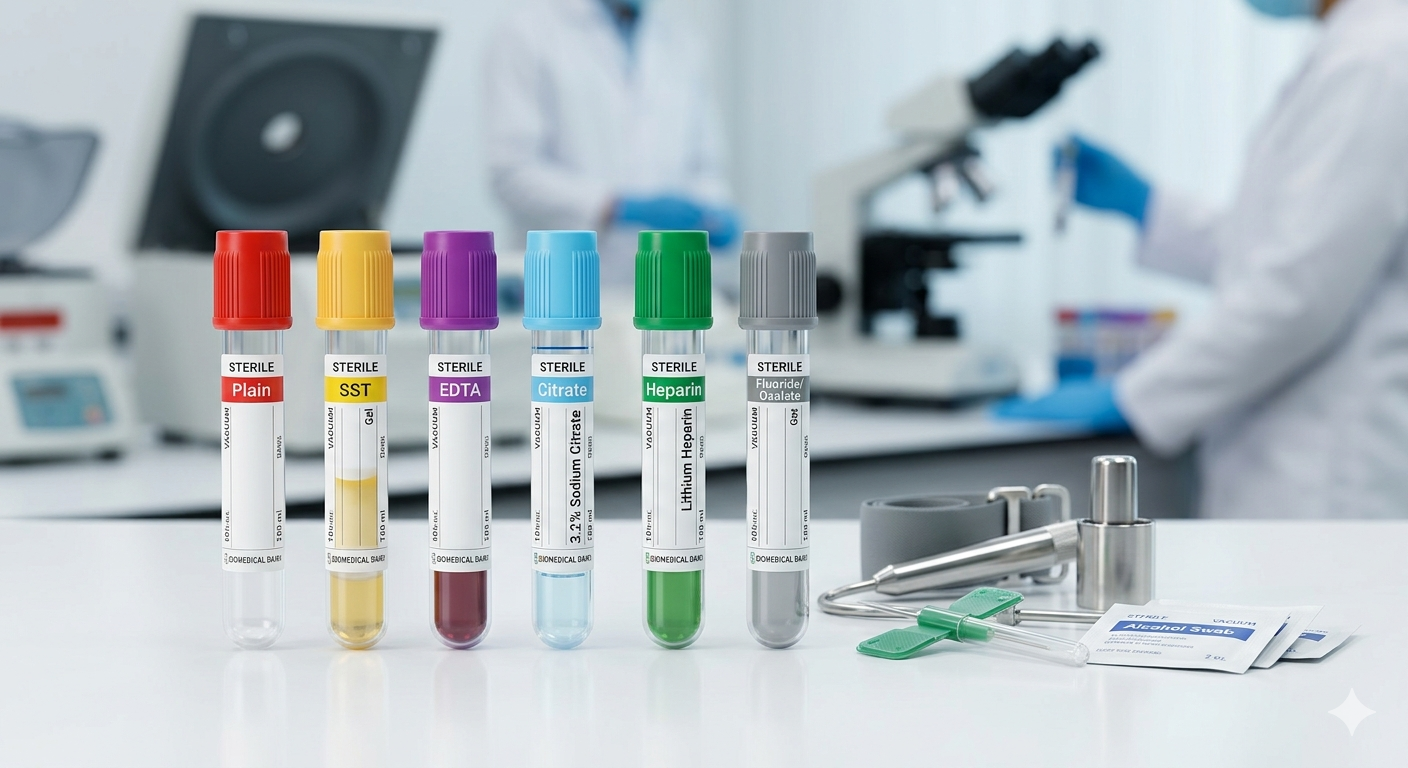
Here is a detailed look at the most common tubes you will encounter in a modern hospital.
A. The Red Top (Plain Tube)
-
Additive: None or Silica (Clot Activator).
-
Action: It allows the blood to clot naturally. After centrifugation, the liquid portion is called Serum.
-
Common Tests: Biochemistry (Liver Function, Kidney Function), Serology, and Immunology.
-
Engineer’s Note: If you are testing a Chemistry Analyzer, these are your most common samples. Ensure the centrifuge is balanced, or the serum will be hemolyzed (red cells burst), which ruins K+ results.
B. The Yellow Top (SST – Serum Separator Tube)
-
Additive: Silica (clot activator) and a Polymer Gel.
-
Action: The gel acts as a physical barrier between the serum and the blood cells during centrifugation.
-
Common Tests: Routine chemistry, Hormones, and Tumor Markers.
-
Engineer’s Note: The gel must be stable. If the gel “leaks” into the sample probe of your analyzer, it can cause a major fluidic blockage.
C. The Purple/Lavender Top (EDTA)
-
Additive: EDTA (Ethylenediaminetetraacetic acid).
-
Action: It binds with calcium in the blood, preventing it from clotting. This preserves the shape of the blood cells.
-
Common Tests: CBC (Complete Blood Count), HbA1c, and Blood Film.
-
Engineer’s Note: This is the primary tube for Hematology Analyzers. If the blood is clotted in this tube, the $PLT$ (Platelet) count on your machine will be falsely low.
D. The Light Blue Top (Citrate)
-
Additive: 3.2% Sodium Citrate.
-
Action: Reversibly anticoagulates the blood by binding calcium.
-
Common Tests: Coagulation studies (PT, APTT, INR).
-
Engineer’s Note: This tube requires a perfect 1:9 ratio of additive to blood. If the tube is under-filled, the coagulation results on your analyzer will be completely wrong.
E. The Green Top (Heparin)
-
Additive: Lithium Heparin or Sodium Heparin.
-
Action: Inhibits thrombin and factor Xa to prevent clotting.
-
Common Tests: Arterial Blood Gas (ABG) and some specialized chemistry.
-
Engineer’s Note: Heparin is the preferred anticoagulant for blood gas analysis because it has the least effect on electrolytes.
F. The Grey Top (Fluoride)
-
Additive: Sodium Fluoride and Potassium Oxalate.
-
Action: Sodium fluoride acts as an antiglycolytic agent—it stops the blood cells from “eating” the glucose in the sample.
-
Common Tests: Blood Glucose (Sugar) and Lactate.
-
Engineer’s Note: Without fluoride, the glucose level in a tube drops by about 5-10% every hour.
3. The “Order of Draw”: The Golden Rule
As a Service Engineer, I have often seen “Ghost” Potassium errors. The K+ is suddenly 10.0 mmol/L (a lethal level), but the patient is perfectly fine.
The Cause? The technician drew the Purple tube (EDTA) before the Red tube. The EDTA contains Potassium, and a tiny drop can contaminate the needle and move into the next tube.
To prevent cross-contamination of additives, always follow this order:
-
Blood Culture Bottles (Sterile)
-
Light Blue (Citrate)
-
Red/Yellow (Serum)
-
Green (Heparin)
-
Purple (EDTA)
-
Grey (Fluoride)
4. Troubleshooting: When the Tube Affects the Machine
In my years at Biomedical Diary, I’ve learned to troubleshoot the “Pre-Analytical” side just as much as the hardware.
-
Sample Hemolysis: If the blood is drawn too quickly or shaken too hard, the red cells break. This releases internal K+ into the serum. Your analyzer will show a high Potassium error. The fix: Check the collection technique, not the machine calibration.
-
Short Fills: As mentioned with the Blue top, an under-filled tube changes the chemical concentration. If your analyzer shows “Out of Range,” check if the tube was filled to the “fill line.”
-
Expired Tubes: Yes, tubes expire! The vacuum inside the tube disappears over time, and the additives can degrade. Always check the expiry date during a lab audit.