In the world of hematology, the Erythrocyte Sedimentation Rate (ESR) remains a vital “gold standard” for detecting non-specific inflammation. As a Biomedical Engineer who has been maintaining laboratory diagnostics since 2017, I have seen the evolution from the manual Westergren method to the high-speed automated infrared analyzers we use today.
While the test seems simple, the engineering required to automate it involves complex optical sensors, precise temperature control, and vibration-free stabilization.
1. The Physics of Sedimentation: The “Rouleaux” Effect
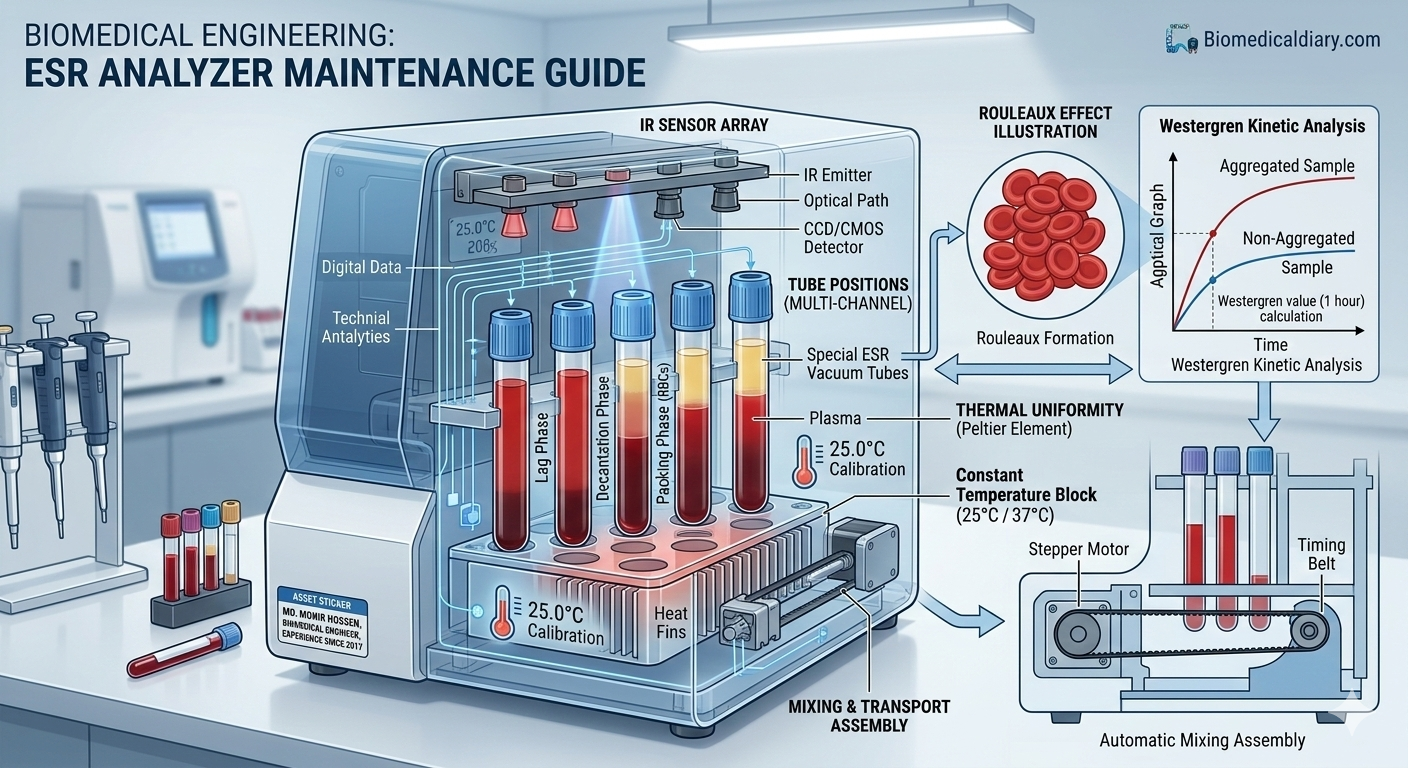
To troubleshoot an ESR analyzer, an engineer must first understand the biology it mimics. When inflammatory proteins (like fibrinogen) are present in the blood, red blood cells (RBCs) stick together to form stacks called Rouleaux. These stacks are heavier than individual cells and sediment faster.
Modern automated analyzers don’t wait 60 minutes like the manual method. They use Kinetic Photometric Analysis to measure the aggregation of RBCs in the first few minutes, using mathematical algorithms to extrapolate the final 1-hour Westergren value.
2. Hardware Architecture: How the Machine “Sees”
Automated ESR analyzers typically rely on two core engineering components:
A. Infrared (IR) Sensor Arrays
The machine uses an IR emitter and a receiver. As the RBCs settle, the plasma becomes clear. The IR light passes through the clear plasma more easily than through the opaque blood. The sensor tracks the “interface” (the line where blood meets plasma) as it moves down the tube.
B. The Constant Temperature Block
Sedimentation is highly sensitive to temperature. A $1^\circ\text{C}$ change can significantly alter the ESR result. Most professional analyzers use a dry-block heater to maintain a steady 25°C or 37°C (depending on the model).
3. Common Technical Failures & Engineering Fixes
Error 1: “Inconsistent Results” or High Coefficient of Variation (CV)
If the same sample gives different results across different channels, the issue is often mechanical.
-
Root Cause: The analyzer is not perfectly level, or there are external vibrations (e.g., a centrifuge running on the same bench).
-
Engineering Fix: Use a high-precision spirit level to calibrate the equipment feet. Ensure the machine is on a “vibration-isolated” surface.
Error 2: Optical “Blockage” Alarms
-
Root Cause: Dried blood or dust on the IR sensors or the glass sleeves.
-
Engineering Fix: Since my start in 2017, I’ve found that many “sensor failures” are actually just dirt. Clean the optical path with a long-neck swab dipped in a mild detergent or 70% Alcohol. Never use abrasive materials on IR filters.
Error 3: “Mixing Error” (For internal mixing models)
Automated analyzers must mix the blood thoroughly before starting the test.
-
Root Cause: A slipping drive belt or a faulty stepper motor in the mixing assembly.
-
Engineering Fix: Inspect the belt tension and lubricate the gear assembly with medical-grade silicone grease.
4. Professional Calibration & Quality Control (QC)
To maintain ISO 15189 compliance, the following engineering checks are mandatory:
-
Optical Verification: Use “Dummy Tubes” (Standardized filters) to verify that the IR sensors are reading the correct optical density.
-
Temperature Mapping: Use an external digital thermometer to verify that the internal heating block is uniform across all positions.
-
Timer Accuracy: Use a calibrated stopwatch to ensure the kinetic reading intervals are precise to the millisecond.
5. Preventive Maintenance (PM) Checklist
A proactive engineer saves the lab from downtime. Follow this schedule:
-
Daily: Run “Normal” and “Abnormal” Liquid Controls.
-
Weekly: Clean the sample transport needles/holders.
-
Quarterly: Perform a “Full Sensor Alignment” via the service menu.
-
Annually: Replace the internal backup battery (CMOS) and check power supply voltages for ripple noise.
Conclusion: The Precision of Automation
Automating the ESR test has reduced human error and shortened turnaround times in the lab. However, these machines require a steady hand and a deep understanding of optical physics to remain accurate. Having managed these systems since 2017, I can attest that the most common “broken” machine is often just one that needs a precise calibration of its thermal and optical sensors.
For technical manuals or specific troubleshooting for brands like Alifax, Diesse, or BD, feel free to contact me.
Md. Monir Hossen Biomedical Engineer Email: monir@biomedicaldiary.com